
Products can be anything you offer to your customers that requires a registration or payment. In this article you will learn how to add new products and make them available for your customers in your online shop
When adding a new product to your LoveAdmin system, you will be asked to choose the specific 'product type' you want to create.
Each product type has specific properties, e.g; the 'Merchandise' product type involves managing stock levels, so it is important to select the most suitable product type for the product you are adding.
For instance, we do not advise that you create a membership product using the 'Money' product type. Instead, it is recommended to use the 'Membership' product type, as it is designed to cater to the specific properties of a membership product.
Subscription/Membership
Some examples of these would be:
- Monthly/Annual subscriptions to a service
- Monthly/Annual Memberships to your organisation
- Insurance
Classes
Classes would be any class, training session or course with scheduled dates.
Merchandise
If you are selling a physical product, like a jumper or baseball cap, then merchandise is the best choice.
Team
A team would be used for a regular training session for a sports team that you wish to use attendance registers for.
Event
Events would be any scheduled event that has multiple purchase options. It is commonly used for holiday camps or ticketed events.
Money
The money unit is the most basic and only allows a price for a single payment. This is typically used to create a basic 'free registration' product.
Products vs. product groups
When you create your products, it is always recommended you organise and group them using product groups.
You can think of product groups as folders which you use to organise the products themselves; product groups are not products and only serve the purpose of letting you organise your products.
Product groups are represented with a folder icon in the side bar, as shown below, with the products themselves grouped inside.

Advantages of using product groups
- Product groups keep your side menu tidy and organised
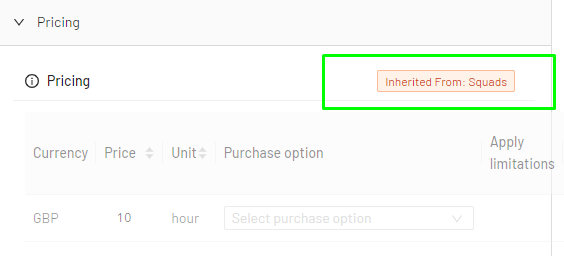
- You can apply product settings at the group level - settings applied at this level will then be inherited by all products beneath.
When product settings have been inherited from the product group, you will see a label on the right-hand side. In the example below, the pricing for the product has been inherited from the pricing applied at the product group level.
- Product groups allow you to filter classes more easily when using your timetable/fixture calendar or when managing your reports. You will see in the example below that groups can be selected when viewing the timetable:

Adding a product
To add a new product, simply go to Settings > Products. If you want to offer a new type of product, like merchandise, or add another class with specific settings (such as age restrictions), you'll need to create a new product.
Note: If you are adding additional dates to an existing product, you don't need to add a new product, you can manage this by editing or adding a schedule.
Steps to add a product:
- Select 'Add Product' from the top right of the products page
- Create a 'Product Group' and select the type of product you wish to create from the drop down menu
- If you are wanting to add a product to an already existing product group, skip to the next set of steps, below.
- Fill in the remaining product details.
 (Click animation to enlarge in a new tab)
Once you have added your product group, you can add additional product sub-groups, or individual products.
Steps:
- 'Select 'Add Product' from the top right of the products page
- Create 'Product' and choose the type of product from the drop down menu
- From the dropdown, choose the existing product group that you would like to add the product to
- Enter the price of the product
 (Click animation to enlarge in a new tab)
Note: If you are using a smaller monitor, you'll need to toggle open the sidebar with the hamburger icon: ![]()
The "Add product button" may also be replaced with a smaller icon: ![]()
Tip: For more information of the options and settings available when creating a product, view our Product settings article here.