How do I enable the Timetable View on the JoinIn shop?
Discover how to set up the Timetable View on your Joinin Shop with this comprehensive guide. Explore the various filters and customisation options that come with using this feature to enhance your customers' booking experience.
What is the Timetable View?
The Timetable View is a customisable display that showcases your scheduled sessions and events in a weekly calendar layout on your shop. This feature is designed to enhance the convenience for both current and prospective customers in finding and booking the products you provide.
Tip: To access our instructional video on how to activate the Timetable View, click here
Steps to enable the Shop Timetable View:
- Navigate to Settings > Organisation > Details
- Expand the 'Shop timetable options' option from the top right
- Select the 'Timetable Active' checkbox
- Press 'Save'
- Done!
Note: With the Timetable view enabled, customers will be rerouted to the shop timetable when they click into any of your scheduled product shop tiles. The timetable 'icon' in your shop banner simply serves as a quick access point for your customers.
Additional filtering options
To help your customers to find the classes they are interested in, you have the option to add extra filters when the Timetable View is enabled. The following filters are available:
- Include 'view all' option in menu to show sessions without set locations: Gives your customers the option to see all scheduled sessions/events, in one click
- Show location in menu and filters: Allows your customers to filter by location
- Show coaches: Allows your customers to filter by coach
- Include images when viewing all products: When in 'view all' mode, product images will not be displayed. Selecting this option ensures product images are still shown when in this view.
Assigning product colours
You can assign colours to specific products, from within your product settings. This not only makes it easier for visitors to find specific sessions in your shop, but it also creates a more visually appealing and cohesive display.
To assign colours to your products:
- Navigate to Settings > Products
- Select a product
- Go to the 'Details' section
- Choose your colour

Note: When you assign colors to your products, these colors will be reflected in both your JoinIn shops Timetable View and the Timetable/Fixtures section on your LoveAdmin account.


Product 'subtitles'
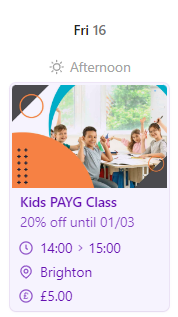
Adding subtitles to your scheduled products is a great way to highlight key product details for customers browsing your JoinIn shop, when the Timetable View is enabled. Subtitles allow you to display extra information and help visitors easily locate the specific sessions they are interested in.
To add subtitles to your scheduled products, follow these steps:
- Navigate to Settings > Products
- Select the product you wish to add a subtitle to
- Navigate to the 'Details' section of the product settings
- Enter the desired text under the 'Optional shop subtitle' field
- Done!
See below, an example of how this will be displayed in your shop:

Tip:If you want to invite people to book a specific session at a certain time, the new Shop Timetable View can help. It generates a unique URL every time you click, allowing you to easily share a pre-filtered timetable with your customers. Simply apply the filter you require, copy the unique URL, and share it with your customers to make booking convenient for them.
