
Step by step guide on different ways to set up trials
What are Trials?
On LoveAdmin, you can set a price to be for trials. This can be used to track who is signing up temporarily and as part of a trial purchase. You can set various limitations, such as:
- How much the trial costs
- How many triallists can be in any one calendar entry
- How long the triallist has to purchase following their trial
- How many trial sessions they can purchase
- How many days in advance a trial can be purchased
- Which calendar entries allow trials
When a contact purchases a trial, they will be marked in the system as a trial contact and will be visible in the timetable as a trial contact. After their trial is over, they will be chased by a notification email to see if they'd like to purchase the full schedule.
Creating a Trial Price
Before you set up your trial price, you'll need to make sure you have multiple prices, or multiple billing settings created.
If your class is non-renewing and bills "Immediately", read our article on multiple prices here. You can check this in the Product settings.
If your class uses any other settings, read our article on multiple billing options here.
Steps
- Navigate to Settings > Products
- Select the product or product group you'd like to allow trials for
- Select "Trial" from the Details list
- Set your trial size limit
- This must be at least 1. An empty box will not allow any trial bookings
- Set days to reserve product post trial
- This will be how long a contact reserves their trial space for before being removed from the schedule - so effectively how long they have to decide to purchase
- Set days in advance user can sign up for trial
- This will limit how many days before the scheduled calendar entry trials are available
- Set number of trials that can be purchased for a person
Note: The way trials currently work mean that the contact will need to pick each of their available dates for trial. There is not currently a way to book a trial onto multiple sessions with a single click, they will need to pick each session they wish to attend, then book.
- Click Save
- Navigate to "Pricing"
- Set your price with the following settings to set it up as a trial price. If the option isn't available, the Restrictions box will explain why. These settings are precise and must be set for trials to function.
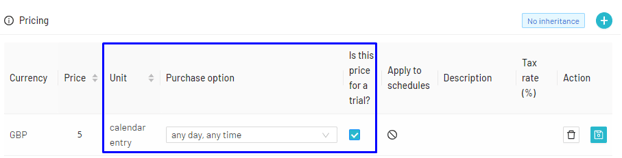
- Click save
This product will appear in the shop as a trial and will book people in as a trial member.
Trial Notifications
Trials have their own set of notifications that can be managed to chase contacts after their trials to automatically offer them a space in the main schedule:
The notification is called "After trial completion" and can be found in Settings > Notifications > Purchases and Payment".
You should find that the notification is set up already when you receive the account. The settings will look like this, if so:

In this instance, the email is set to chase the customer after 5 days. This notification behaves slightly differently from others as it must be set to set after a trigger. To adjust when the email chases:
- Click on the blue text in the "Timing" column
- Choose "[n][Frequency]..."
- Set n to the number of days you'd like to wait before the email is set
- Choose After
- Choose Trigger
- Click save
Changing the "n" value will let you set how many days after the payment is not initiated that you'd like the emails to send.
Multi-session trials
If your organisation offers multi-session trials, for example a two week or one month trial period, you can now manage this offering and workflow through the system.
Before you enable multi-day trials, ensure you have first completed the following steps:
- Add a Trial size limit under the Trials section of the Product Settings
- You have added your trial and price under the Pricing section of the product
- Trials can only occur across consecutive dates. Therefore, you must use calendar entry unit pricing, with the 'Same day of the week time' or 'All calendar entries' purchase option. 'All calendar entries' will add attendees to sessions as they consecutively occur in the schedule.
- Navigate to Home > Settings > Products
- Select your product from the left side-menu and open the Trials property setting
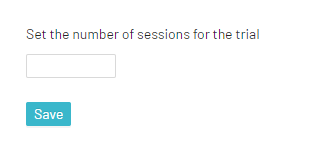
- Set the number of sessions for the trial accordingly, for example '2', and Save.
Trialists will be added to all relevant days in your timetable. An invitation can be sent to the trialist to purchase the full product, when marked as having attended the last session in the trial.